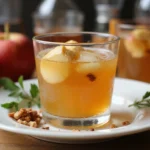

This Easy Fruit Cocktail Dump Cake is the ultimate sweet and simple dessert that everyone will love.
The delightful combination of fruity goodness and cake creates a comforting treat perfect for any occasion.
I first stumbled upon this recipe at a summer picnic, where the vibrant colors and aromas drew me in instantly.
It’s incredibly easy to make, allowing you to impress guests without spending hours in the kitchen.
The History and Cultural Significance
• Fruit Cocktail Dump Cake traces its origins to the United States in the mid-20th century, where home cooks sought easy dessert solutions.
• The dish evolved over decades as various fruits and flavors were incorporated, eventually becoming the beloved version we enjoy today.
• In American culture, this dessert traditionally appears at potlucks, family reunions, and summer gatherings, symbolizing joy and togetherness.
• While many variations exist across different regions, the authentic version maintains its signature simplicity and fruity sweetness that sets it apart from other cakes.
Recipe Overview
Nutritional Information (per serving)
Ingredients
Essential Equipment Guide
Mixing Bowl: A sturdy mixing bowl is essential for combining ingredients without spilling. Look for one that is large enough to accommodate all the ingredients without overflowing.
9×13-inch Baking Dish: This size is ideal for the dump cake, allowing for even baking. Opt for a glass or metal dish to ensure proper heat distribution.
Rubber Spatula: This tool is important for scraping down the sides of the bowl and incorporating ingredients thoroughly. A silicone spatula is heat-resistant and easy to clean.
Preparation Methods
Dump Method: This technique involves layering ingredients directly into the baking dish without mixing. This method is essential for the dump cake, allowing the flavors to meld during baking. Ensure that the fruit is evenly distributed for consistent flavor throughout.
Layering: Proper layering will ensure a balanced distribution of flavors. Start with the fruit layer, then sprinkle the dry cake mix on top, followed by pouring the melted butter evenly. This technique is crucial for achieving the perfect texture.
Baking: Baking at the right temperature is key to a golden crust and properly cooked cake layer. Preheat the oven to 350°F and check for doneness by inserting a toothpick into the center; it should come out clean.
Step 1: Prepare Ingredients

Begin by gathering all your ingredients on the counter.
Make sure the fruit cocktail is drained to avoid excess moisture.
Chop the pineapple chunks and peaches if they are whole.
Having everything ready will streamline the preparation process.
Step 2: Preheat the Oven

Set your oven to preheat at 350°F (175°C).
Allow the oven to fully heat before placing the cake inside.
This ensures even baking and helps the cake rise properly.
Use an oven thermometer to check accuracy if you have one.
Step 3: Layer the Fruit

In a 9×13 inch baking dish, start by evenly spreading the drained fruit cocktail across the bottom.
Next, layer the pineapple chunks and peaches on top of the fruit cocktail.
This creates a flavorful base for the cake layer.
Make sure the fruit is evenly distributed to avoid dry patches in the final cake.
Step 4: Add the Cake Mix

Sprinkle the yellow cake mix evenly over the fruit layer.
Do not mix the cake mix with the fruit; it should remain layered.
Ensure that the cake mix covers the fruit completely for a well-risen cake.
Use a spoon or your fingers to break up any clumps in the mix.
Step 5: Pour the Butter

Melt the stick of butter and pour it evenly over the cake mix layer.
This will create a rich, buttery crust as it bakes.
Try to cover as much of the cake mix as possible for optimal results.
Don’t worry about mixing; just drizzle the butter evenly.
Step 6: Add Nuts (Optional)

If using, sprinkle chopped nuts on top of the butter layer.
This adds a delightful crunch and flavor contrast to the soft cake.
Make sure the nuts are evenly distributed for consistency.
Feel free to use walnuts, pecans, or almonds based on your preference.
Step 7: Bake the Cake

Place the baking dish in the preheated oven.
Bake for 35-40 minutes, or until the top is golden brown and the edges are bubbling.
Check for doneness by inserting a toothpick into the center; it should come out clean.
Keep an eye on the cake towards the end to avoid over-baking.
Step 8: Cool and Serve

Once baked, remove the cake from the oven and let it cool for about 10-15 minutes.
This cooling time helps the layers set before serving.
Serve warm, topped with whipped cream if desired.
Enjoy your delicious fruit cocktail dump cake with family and friends.
Critical Timing and Temperature Guide
Preheating: Always preheat your oven to 350°F (175°C). This ensures even baking from the start, preventing uneven textures.
Baking Duration: Bake for 35-40 minutes, checking for a golden brown top and bubbling edges. An overbaked cake may become dry, so monitor closely.
Cooling Time: Allow the cake to cool for at least 10 minutes after baking. This helps the fruit juices settle and the cake to firm up for easier serving.
Pro Tips for Fruit Cocktail Dump Cake Recipe Sweet And Simple Dessert
• Ingredient Selection: Use high-quality canned fruit for the best flavor. Look for fruit packed in juice rather than syrup for a healthier option.
• Preparation Secret: Consider mixing a teaspoon of vanilla extract into the melted butter for added depth of flavor.
• Temperature Management: Ensure your butter is melted but not hot when pouring over the cake mix to avoid cooking it prematurely.
• Texture Enhancement: For a crispier top, broil the cake for the last 2-3 minutes of baking.
• Flavor Layering: Adding a sprinkle of cinnamon or nutmeg over the cake mix can enhance the flavor profile.
• Make-Ahead Strategies: Pre-assemble the fruit layer and cake mix in the dish, then cover and refrigerate overnight. Bake the next day.
• Restaurant-Quality Finishing Touches: Garnish with fresh mint leaves or serve with a scoop of vanilla ice cream for an elevated experience.
• Equipment Optimization: Use a non-stick baking dish to ensure easy removal and cleanup.
Troubleshooting Common Issues
• Texture Too Dense: This may occur if the cake mix was packed down. Always sprinkle the mix lightly and do not press it down.
• Overly Sweet: If the cake is too sweet, consider choosing fruit varieties without added sugar or reducing the amount of butter.
• Uneven Baking: This can happen if the oven is not preheated properly. Always check the temperature with an oven thermometer.
• Fruit Sinking: If the fruit sinks, ensure that the cake mix is evenly distributed and the butter is poured over the top.
• Burnt Edges: If the edges burn while the center is still raw, consider lowering the oven temperature by 25°F and extending the cooking time.
Variations and Regional Differences
• Pineapple Upside Down Dump Cake: This variation uses pineapple rings and maraschino cherries for a classic twist, with the cake cooked upside down.
• Berry Dump Cake: Substitute the fruit cocktail with mixed berries for a tart flavor profile, enhancing the freshness of the dessert.
• Chocolate Dump Cake: Layer chocolate pudding and cake mix for a rich version, incorporating cocoa powder instead of fruit for a dessert lover’s dream.
• Modern Interpretations: Incorporate gluten-free cake mix or fresh fruits to meet current dietary preferences while maintaining the dish’s essence.
Food Science Behind the Recipe
• Maillard Reaction: This chemical reaction occurs between amino acids and reducing sugars during baking, creating the beautiful golden-brown crust and enhancing flavors.
• Moisture Retention: The combination of fruit and cake mix helps to retain moisture, preventing the cake from drying out and ensuring a tender texture.
• Layering Techniques: Using the dump method allows the moisture from the fruit to infuse the cake mix, resulting in a delightful mix of textures and flavors.
Frequently Asked Questions
What’s the most common mistake people make when preparing Fruit Cocktail Dump Cake? The most common mistake is not draining the fruit properly, which can lead to a soggy cake. Make sure to thoroughly drain all canned fruit before use.
Can I prepare components of this dish in advance? Yes, you can prepare the fruit layer and cake mix in advance, refrigerating them separately. Assemble and bake when ready.
How do I adapt this recipe for dietary restrictions? For gluten-free options, use a gluten-free cake mix and ensure the canned fruits are also gluten-free.
What’s the best way to store and reheat leftovers? Store leftovers in an airtight container in the refrigerator for up to 3 days. Reheat in the microwave for about 30 seconds or until warm.
Can I freeze this dish? Yes, you can freeze the baked cake for up to 3 months. Thaw in the refrigerator overnight before reheating.
What wine or beverages pair best with this dish? A sweet Riesling or a fruity sangria complements the dessert well, balancing the flavors of the fruit.
How can I scale this recipe up for a crowd? To serve more, simply double the ingredients and use a larger baking dish, extending the baking time as necessary.
What side dishes complement this recipe best? Serve with a light salad or a scoop of vanilla ice cream for an enjoyable contrast to the sweetness of the cake.
How do professional chefs elevate this dish for restaurant service? Professional chefs often serve it with a gourmet twist by adding homemade whipped cream and fresh seasonal berries.
Serving and Presentation Guide
• Traditional Presentation: Serve the dump cake directly from the baking dish with a scoop of whipped cream on top, garnished with fresh mint leaves.
• Modern Plating Ideas: Use a round cake mold to create individual servings, plating with a drizzle of fruit sauce around the plate.
• Accompaniment Suggestions: Pair with vanilla ice cream or a refreshing fruit salad to balance the sweetness.
• Special Occasion Presentation: For celebrations, consider serving in elegant dessert cups with layers visible, topped with a sprinkle of nuts and edible flowers.
Conclusion
I hope you enjoy making this Easy Fruit Cocktail Dump Cake as much as I do.
It’s a delightful way to bring a sweet touch to any gathering.
Don’t hesitate to experiment with different fruits and flavors to make it your own.